Radon
- Radon in Homes
- Radon Testing
- Radon in Real Estate
- Find a Radon Measurement Professional
- Find a Radon Mitigation Professional
- Radon Mitigation Systems
- Financial Assistance
- Radon Resistant New Construction
- Licensing for Radon Professionals
- Radon Licensing System
- Laws, Rules and Standards
- Radon Poster Contest
Related Topics
Environmental Health Division
Radon Mitigation Systems
Radon mitigation is any process or system used to reduce radon concentrations in buildings. The goal of the radon mitigation system is to reduce the indoor radon level as low as reasonably achievable. All systems should reduce radon below the EPA action level of 4 pCi/L (picocuries of radon per liter of air). A quality radon mitigation system may reduce year-round levels to below 2 pCi/L.
A home's foundation type helps determine the radon mitigation system that will work best. A licensed radon mitigation professional should determine the type of mitigation system to install and may conduct some diagnostic testing to help guide where to place the mitigation system.
Radon mitigation systems use a fan to continuously pull air from the soil and vent it outdoors through a pipe that ends above the edge of the roof. The pipe can either run inside or outside the home and vents outside, away from windows and openings. In addition, cracks and openings in the foundation are sealed. Sealing limits the flow of radon and makes the radon mitigation system more efficient.
Three of the most common types of radon mitigation systems
- Sub-slab suction - Pulls radon directly beneath the home's foundation and vents it outside.
- Drain tile suction - Pipe penetrates into the drain tile and vents the soil gases outside. Covers are placed on the sump baskets.
- Sub-membrane - Used in crawl spaces, a plastic sheet covers exposed dirt on the floor, extends up onto the wall and is sealed. A radon pipe penetrates the plastic sheeting, pulls the soil gas from the crawl space, and vents it outside.
Radon mitigation system components

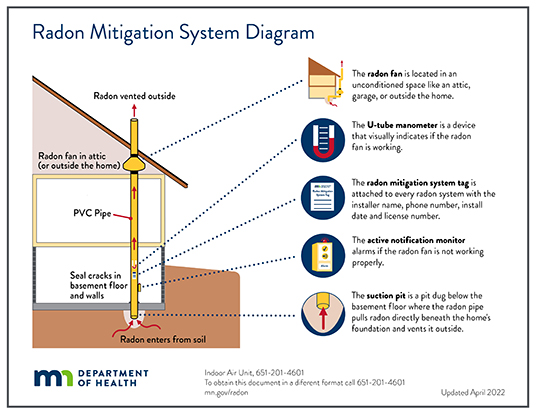
(Click on image above to enlarge)
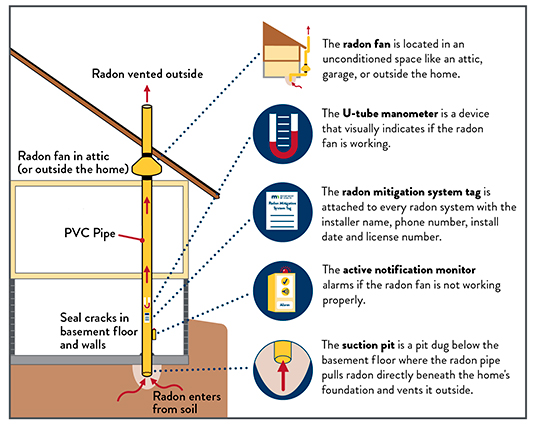
Radon fan is located in an unconditioned space, like an attic, garage, or outside to prevent radon leaking back into the home. The fan cannot be in or below a livable space. The fan is plugged into an electrical junction box or hard wired.
U-tube manometer is a device that visually indicates if the fan is working.
Radon system tag is placed on the system by a licensed radon professional once the system is complete and includes the installer name, phone number, install date and license number.
Active notification monitor alarms if the fan is not working properly.
Suction pit is dug below the basement floor where the radon pipe pulls radon directly beneath the home’s foundation and vents it outside.
Radon pipe is a PVC pipe that vents radon outside. It must be at least 10 feet above ground, 10 feet away from windows, openings, doors, openings to adjacent buildings (if the exhaust pipe(s) does not vent at least 2 feet above these openings), and above the edge of the roof.

(Click on image above for printable version of the Radon Mitigation System Diagram (PDF).
Cost of a radon mitigation system
The cost can depend on many factors including the type of radon system to be installed and how your home was built. In general, costs can range from $1,500 to $3000. Financial assistance may be available to help pay for a radon mitigation system and depends on household income, geographic location, and funding availability.
Finding a professional to install a radon mitigation system
Minnesota requires radon mitigation professionals to be licensed.
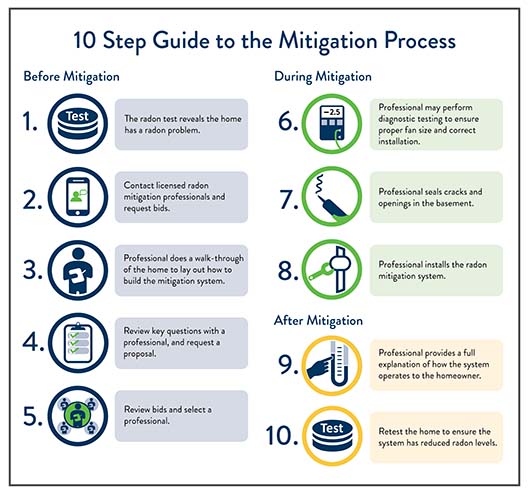
10 step guide to the radon mitigation process
Before mitigation
1. Radon test reveals the home has a radon problem.
2. Contact licensed radon mitigation professionals to request bids.
3. Professional does a walk-through of the home to layout how to build the mitigation system.
4. Review key questions with professional and request a proposal.
5. Review bids and select a professional.
During mitigation
6. Professional may perform diagnostic testing to ensure the proper fan size and correct installation.
7. Professional seals cracks and openings in the basement.
8. Professional installs the radon mitigation system.
Post mitigation
9. Professional provides a full explanation of how the system operates to the homeowner.
10. Retest the home to ensure the system has reduced radon levels.

(Click on image above to enlarge)
Other key features of a radon mitigation system
- Radon reduction systems must be clearly labeled. This will avoid accidental changes to the system which could disrupt its function.
- A post-mitigation radon test should be done. Wait at least 24 hours after your new system has been operating to do this.
- Written operating and maintenance instructions and copies of any warranties should be provided.
- Most radon mitigation system installations require electrical work to power the radon fan which requires an electrical permit. If a contractor is doing the work, the person must be licensed. For questions regarding electrical permits, licensing, or inspection, contact the Department of Labor and Industry at dli.electricity@state.mn.us or 651-284-5026.
Inspection of your radon mitigation system
Contact MDH to request a free inspection of your radon mitigation system, if installed after June 2020.
- Email: health.indoorair@state.mn.us or by phone at 651-201-4601
Go to > top
